Original Link: https://www.anandtech.com/show/4732/asus-p8p67-review
ASUS P8P67 Review
by Brendan van Varik on September 8, 2011 10:45 AM EST- Posted in
- Motherboards
- Asus
- P67
Today, we will be looking at the ASUS P8P67. Although the board has been available for some time, this is one of ASUS' cheaper full size ATX offerings. Considering it has a price tag of $155 ($140 with rebate), it offers quite a few useful features such as DIGI+ VRM, BT GO! (Bluetooth), a total of four USB 3.0 ports, and Quad-GPU CrossFireX support.
Even though the P8P67 does not offer as many features as the more expensive models in this range, or even some of the optional extras in the box which other boards come with in the same price range, it does perform better than you may have initially thought. The biggest complaint we have is the second PCIe x16 slot only operates in x4 mode, which does impact multi-GPU performance. The board's power consumption is also higher than other motherboards we have tested. Overall, I would say this motherboard is a good contender in the sub $160 price range but some of the additional extras which come with the ASRock P67 Extreme4 for example may be enough to sway people towards that board instead.
Visual Inspection
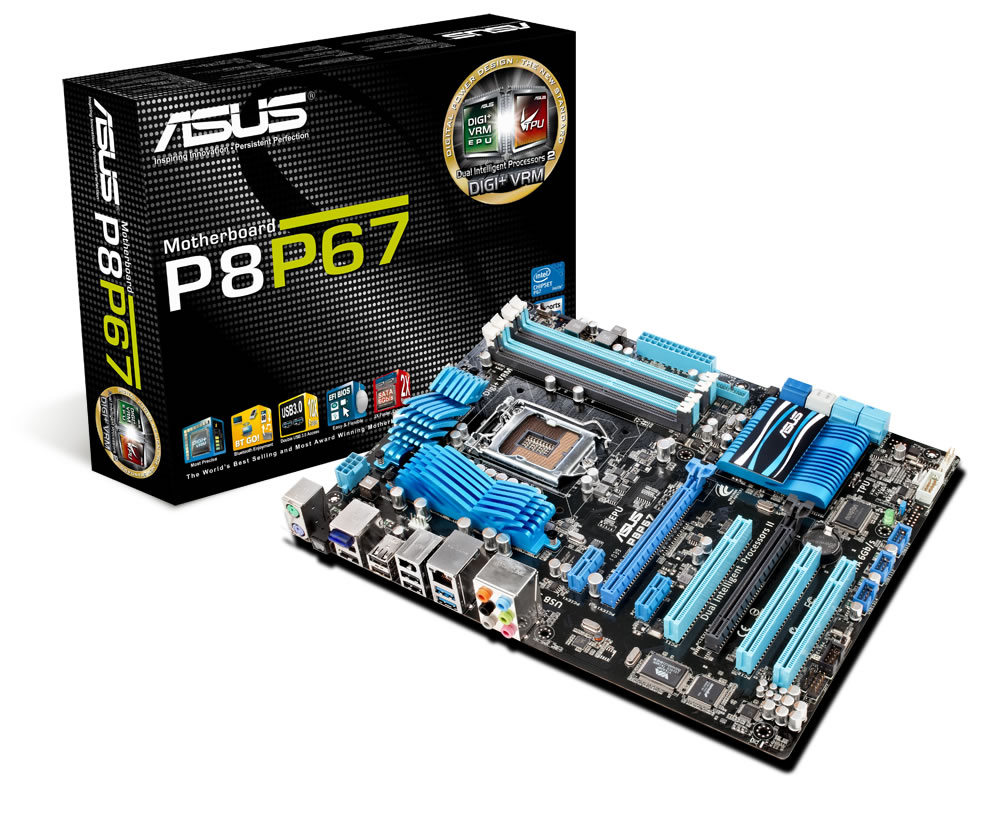
ASUS has decided to go with a blue and black color scheme, which is built upon a black PCB. The black and blue theme carries its way throughout the motherboard on to the expansion slots, RAM slots and the heat sinks as well.
Just like all of the latest ASUS range, their latest TPU (TurboV Processing Unit) and EPU (Energy Processing Unit) processors are on this motherboard. The EPU chip is designed to analyze the actual CPU loading and dynamically regulate the various system power saving and performance parameters in real time. By doing this, it creates an optimal energy saving configuration. The TPU takes care of the system performance - it automatically raises the systems clocks to provide the extra grunt whenever it is required and it also relieves parts of process-intensive tasks from the CPU.
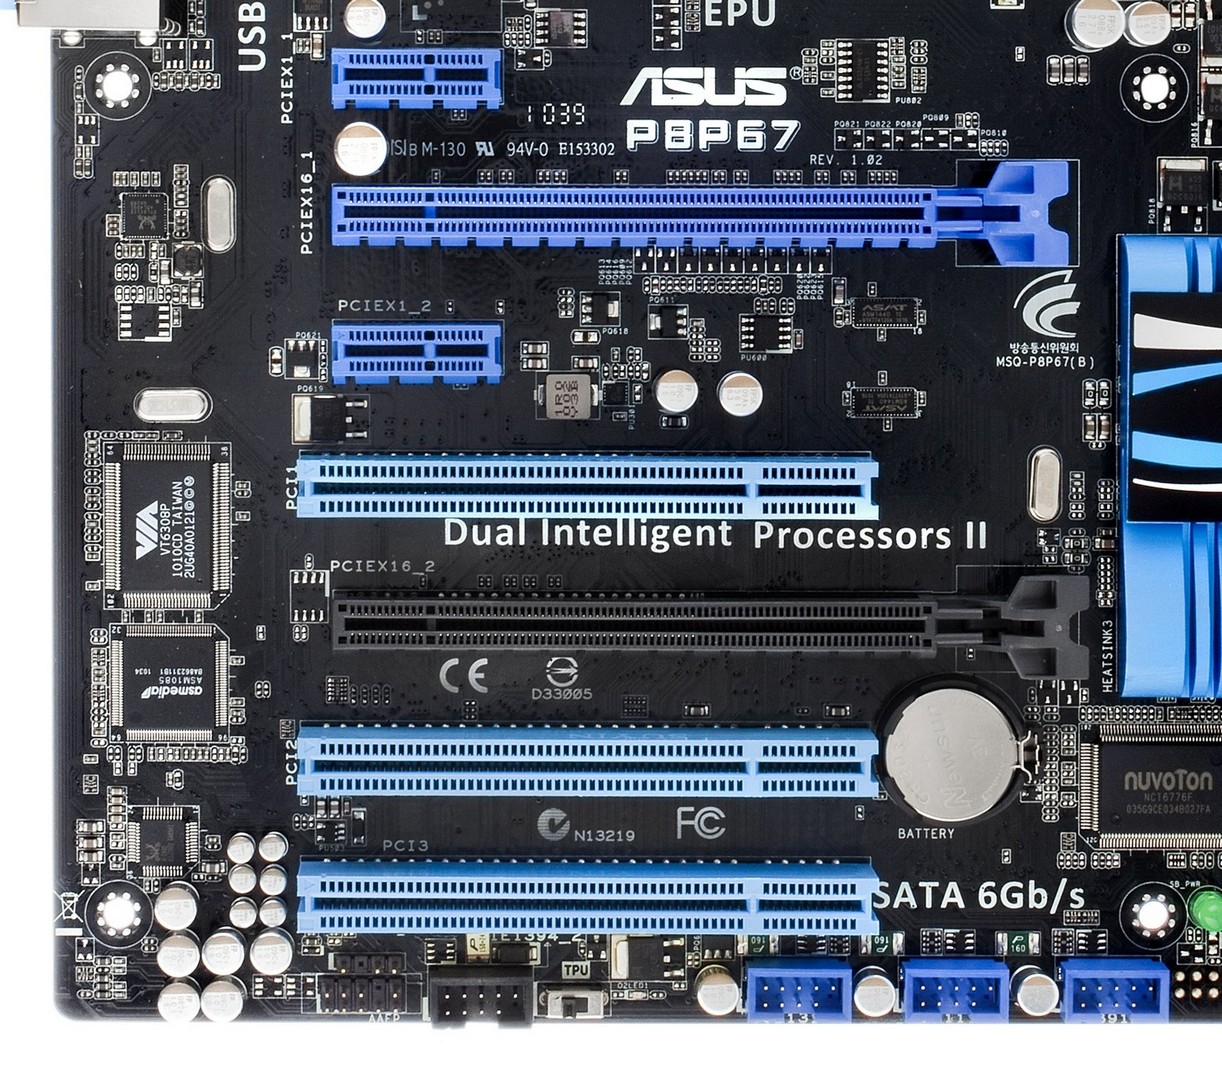
Just like most motherboard manufacturers of the modern age, ASUS has designed the slot layout fairly well. With a GPU, or even two, you will still have a PCIe x1 slot available. They have also allowed for a two slot gap under the GPU which will allow the top card to breathe a little better when using a dual GPU configuration. Unfortunately, you will only be able to use one PCIe x1 slot when you have a dual slot graphics cards.
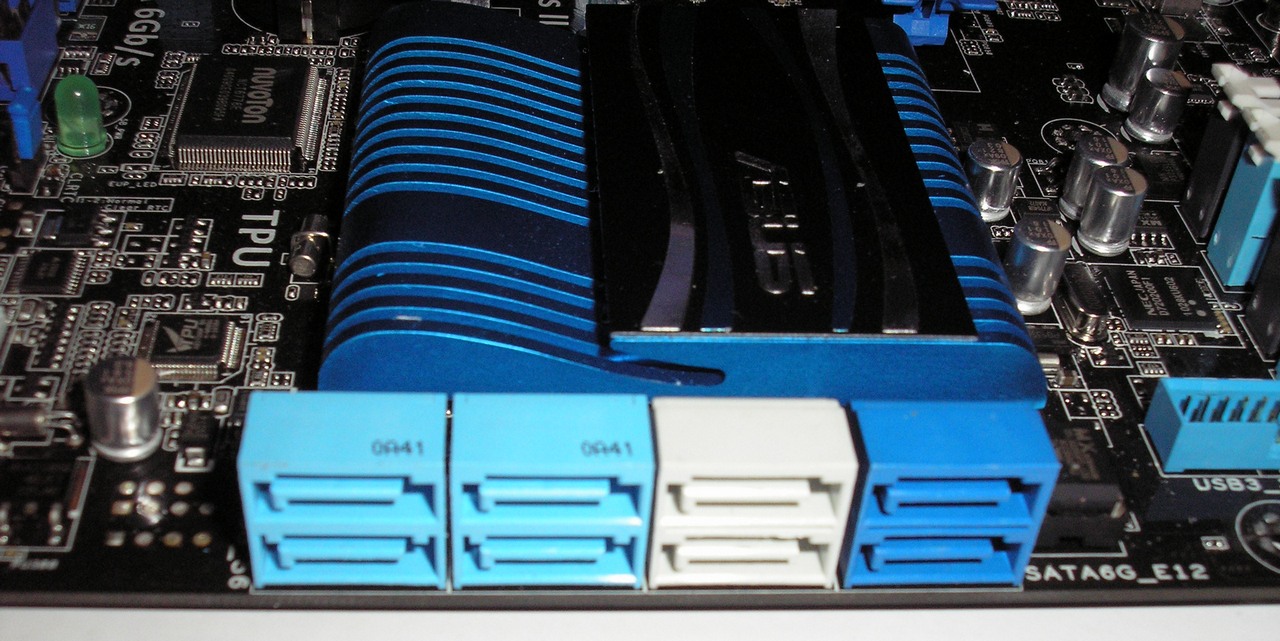
The P8P67 has a total of four SATA 6 Gbps connections available; however only two of them allow for a RAID array. The navy blue ports, which are on the Marvell controller, do not have RAID support whereas the gray PCH ports feature RAID 0, 1, 5 and 10. The four light blue ports are SATA 3 Gbps.
There are a total of four fan headers on the P8P67 and they are in what I would consider good locations. The CPU header is located above the socket, toward the top of the motherboard. There is another one labeled PWR_FAN; it is located just above the MemOK! button. To finish it off, there are two case fan connections, one of which is to the left of the CPU socket and the other one is located just above the front panel connections.
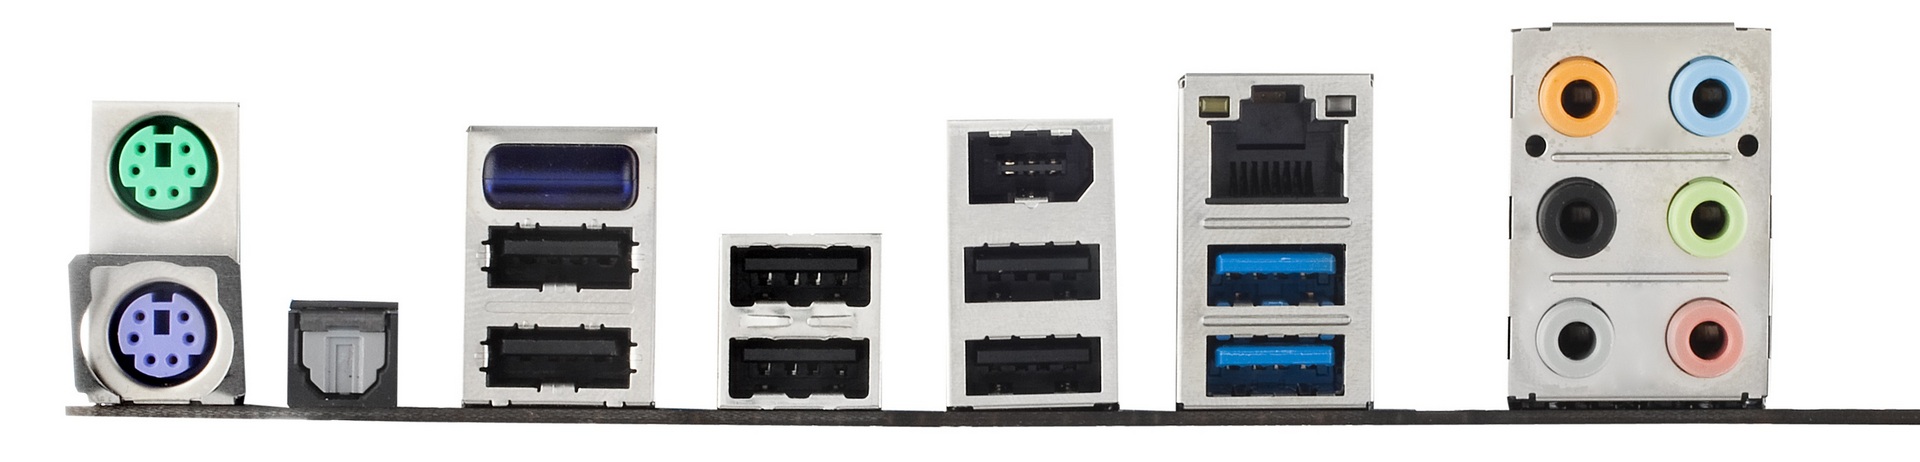
The back panel contains two PS/2 connectors, a SPDIF output, a total of six USB 2.0 and two USB 3.0 ports. A Firewire port is included as well as the built-in Bluetooth. To finish off, there is a single gigabit Ethernet port and the typical audio jacks.


BIOS
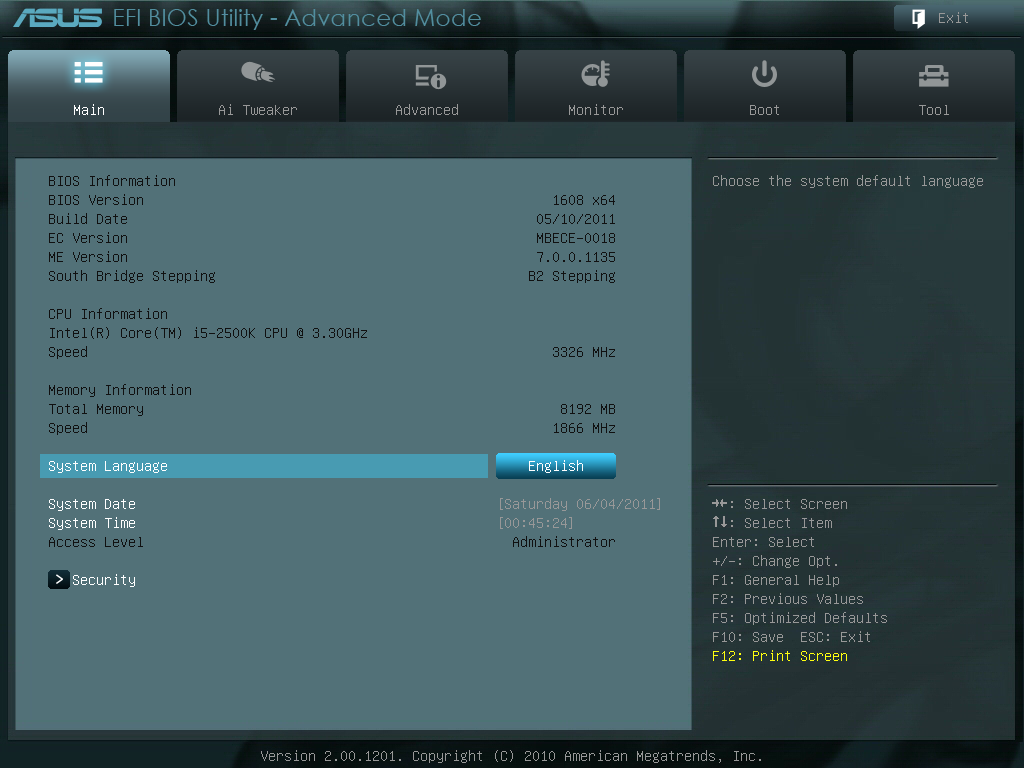
When you enter the BIOS for the very first time, you’ll be faced with the screen below. If you want to do any serious tweaking, you will have to enter the Advanced Mode, which you can do by clicking on the button located in the top right-hand corner.
At a quick glance, the basic BIOS layout shows more or less everything you need. It shows the CPU and motherboard temperatures, the voltages, fan settings with the current fan speeds and the boot sequence, which is switchable.
You can update the BIOS with relative ease with a USB flash drive. You will need to be in Windows in order to download the BIOS from ASUS’ website and to extract the .ROM file. It my experience, my 8GB stick was not detected, which is most likely a compatibility issue. However I did have a 4GB flash drive which did work in flashing to the latest BIOS.

The BIOS features a full UEFI system and it is easy to use. Everything is located where you would expect it to be and I can only find two issues with the BIOS. During this review, I used the 1608 BIOS which does not report CPU temperatures correctly. I also experienced that selecting the ‘OC Tuner’ option in the BIOS made the motherboard lock itself into an infinite boot cycle which would not disappear without a full CMOS reset.
After I did my testing, I updated the BIOS to the 1808 release which appears to have solved the CPU temperature issue.
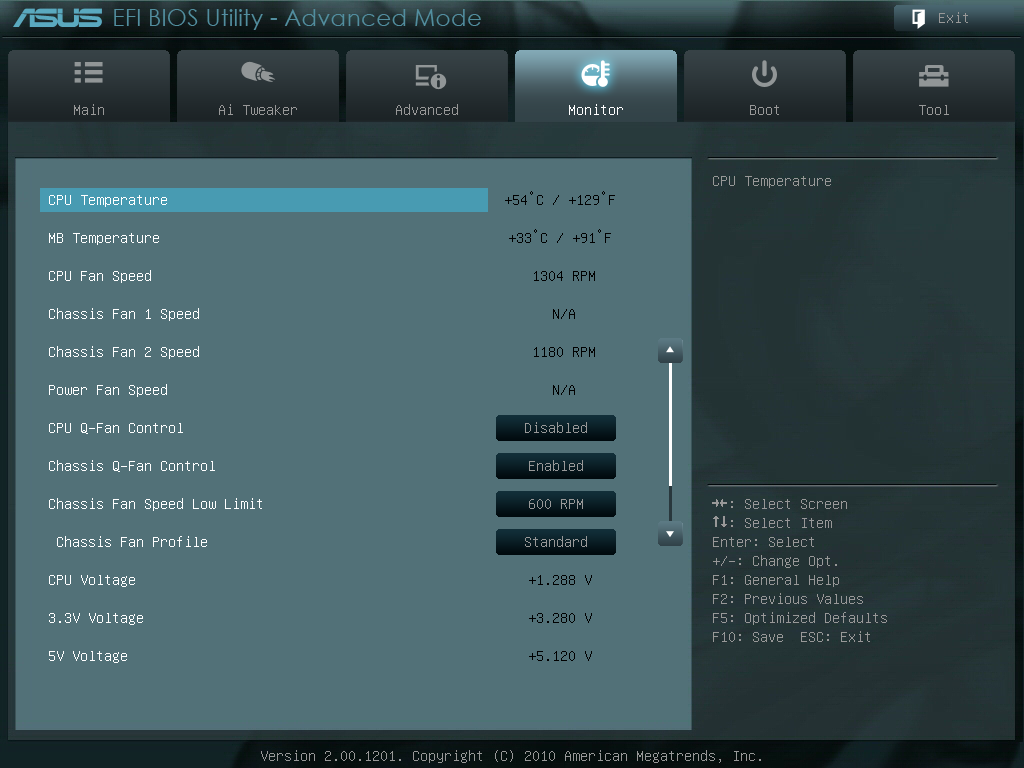
As you can see from the screenshot above, there are not very options to change your fan settings. Just like in the ASUS Suite (noted in the software section of this review), you can choose from a few presets to change the fan speeds or you can manually assign some of your own.


Overclocking
As the ASUS Suite software allows gives us an option to ‘Auto Tune’ our PC from within Windows, I figured I would start out there. The 'Fast' pre-set was tested, giving a 31% overclock. It has increased the BCLK to 103 and the multiplier is set at 42. The RAM also got a boost up to 1866MHz by using X.M.P profiling.
After an hour at full load under OCCT, CPU-Z reported a maximum voltage of 1.296v when under load – my previous tests revealed that this particular CPU needed between 1.32 and 1.34v (set in the BIOS with high Load Line Calibration/‘LLC’) to be completely stable. The minimum voltage went down to 1.27v which could be tweaked a little with different LLC settings.
Considering how the software had taken care of the overclock, I was eager to try out the ‘Extreme’ preset. Sadly the results were not as impressive - the system attempted to raise the BCLK from 103MHz which it was set at from the ‘Fast’ pre-set to 103.5MHz. The system fell over and produced a blue screen. Once the system had restarted itself, it attempted to raise the BCLK to 103.5MHz again. It failed for a second time and on the third restart it left me with the same overclock as I originally had on the 'Fast' pre-set.
Using a maximum voltage of 1.42 V (1.75 V PLL) on the CPU, I was able to successfully boot up at 46x103 which gave me a final clock speed of 4738MHz. The system was nowhere near stable but it would get into Windows and run a few tests before crashing. By lowering the BCLK to 100 and increasing the multiplier to 47, I was able to get it stable enough to run all of our benchmarks. It was extremely easy to reach a 4700MHz clock speed. It was a case of finding the right voltage to match the given CPU frequency.
So, I removed the ‘safe’ voltage boundary and boosted the multiplier to see how far this board would really go. Just so that there was some extra headroom, the voltages got a slight increase, 1.5v on the core and the PLL voltage got a slight bump up to the original 1.8v. Windows would not boot at 5GHz, or 4.9GHz for that matter. At 48x100, Windows booted up straight away but when I tried to push the system past 101.5 BCLK, it would instantly result in a blue screen of death.
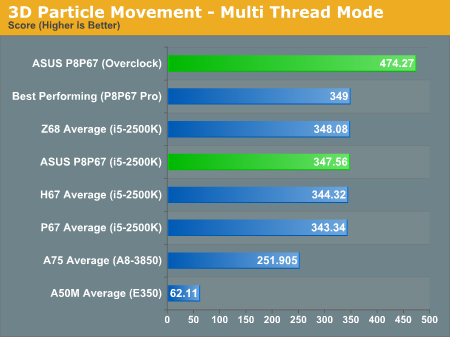
I decided to opt for a CPU voltage of 1.42 V and a PLL voltage of 1.75 V to do the rest of my testing with this motherboard. I wanted to demonstrate what sort of an effect overclocking has and what the benefits to it really are. In this instance, I ran our 3D Movement benchmark. I only ran the benchmark once to give you a rough idea of the performance gains. At stock speeds with turbo disabled, the overall score came in at 104.32 for the single threaded benchmark and 331.88 for the multi-threaded version. For a 29.7% overclock, there was a 27.8% increase (104.32 to 144.87) in performance using the single threaded application and a 30% (331.88 to 474.27) increase in the multi-threaded benchmark.
Board Features
| ASUS P8P67 | |
| Market Segment | Performance |
| CPU Interface | LGA 1155 |
| CPU Support | Sandy Bridge i3/i5/i7 |
| Chipset | P67 |
| Base Clock Frequency | 38.0 MHz to 400.0 MHz in 0.1 MHz intervals |
| DDR3 Memory Speed | 1333 MHz by default, 800-2133 MHz supported |
| Core Voltage | Auto, offset or fixed modes, 0.800 V to 1.800 V in 0.015 V intervals |
| CPU Clock Multiplier | Dependant on CPU |
| DRAM Voltage | Auto, 1.108 V to 2.464 V in 0.007V intervals |
| DRAM Command Rate | Auto, 1T-3T |
| Memory Slots |
Four 240-pin DDR3 DIMM slots in dual-channel Regular unbuffered DDR3 memory Up to 32GB total supported |
| Expansion Slots |
2 x PCI Express 2.0 x16 slots (x16/x0 or x16/x4) 2 x PCI Express 2.0 x1 slot 3 x PCI slots Supports ATI Crossfire |
| Onboard SATA/RAID |
2 x SATA 6.0 Gb/s ports (gray) supporting RAID 0/1/5/10 4 x SATA 3.0 Gb/s ports (blue) supporting RAID 0/1/5/10 2 x SATA 6.0 Gb/s ports (navy blue) from Marvell 88SE9172 |
| Onboard |
4 x SATA 3Gb/s connectors 4 x SATA 6Gb/s connectors 4 x Fan Headers (1x4-pin, 3x3-pin) 3 x USB 2.0 headers support additional 8 USB 2.0 Ports 1 x Front panel switch/LED header 1 x TPM module connector 1 x USB3.0/2.0 header 1 x IEEE 1394a header 1x SPDIF Out header 1x Serial port header 1 x Firewire/IEEE 1394 header 1 x Front panel audio header 1x Clearing CMOS jumer |
| Onboard LAN | 1 x Realtek RTL8111E chip (10/100/1000 Mbit) |
| Onboard Audio | Realtek ALC889 Codec, 2/4/5.1/7.1-channel, Dolby Home Theater, S/PDIF Out |
| Power Connectors |
24-pin EATX Power connector 8-pin EATX 12V Power connector |
| Fan Headers |
1 x CPU Fan (4-pin) 3 x SYS Fan (3-pin) |
| IO Panel |
1 x PS/2 keyboard/mouse port 1 x optical S/PDIF Out connector 1 x DisplayPort 6 x USB 2.0/1.1 ports 1 x IEEE 1394a port 2 x USB 3.0/2.0 ports 1 x RJ-45 port 6 x audio jacks (Center/Subwoofer Speaker Out/Rear Speaker Out/Side Speaker Out/Line In/Line Out/Microphone) |
| BIOS |
1 x 32 Mbit flash Use of licensed AWARD BIOS Support for DualBIOS™ PnP 1.0a, DMI 2.0, SM BIOS 2.4, ACPI 1.0b |
| Warranty Period | 3 Years |
What’s in the box?

A users guide to the motherboard and DIGI+ VRM/BT GO!
Driver and utilities DVD
2x SATA 6Gb/s cables
2x SATA 3Gb/s cables
1x 2-port USB / 1 eSATA PCI bracket
1x 2-in-1 ASUS Q-Connector kit
I/O Shield
ASUS sticker
There are a few extras included with this motherboard. ASUS have kept it down to minimize costs and they did not include the USB 3.0 front panel with this motherboard although they do include it with their more expensive options. It is a shame; I would have liked to see one with this board, especially when you consider that the ASRock P67 Extreme4 comes with one and is in a similar price bracket.
Software
When it comes down to installing the software for the motherboard, you can choose to install the software one by one or you can install all of them at once. In this case, everything was installed to ensure a fair test. The installation was straight forward. If you select the ‘InstAll’ option, the computer will install all of the drivers and restart a total of three times during the process of installation.
ASUS AI Suite II

The AI Suite II has a vast amount of programs installed within it. The program initially loads in a thin bar which allows you access the various parts of it by clicking on whichever part of the software you wish to use.
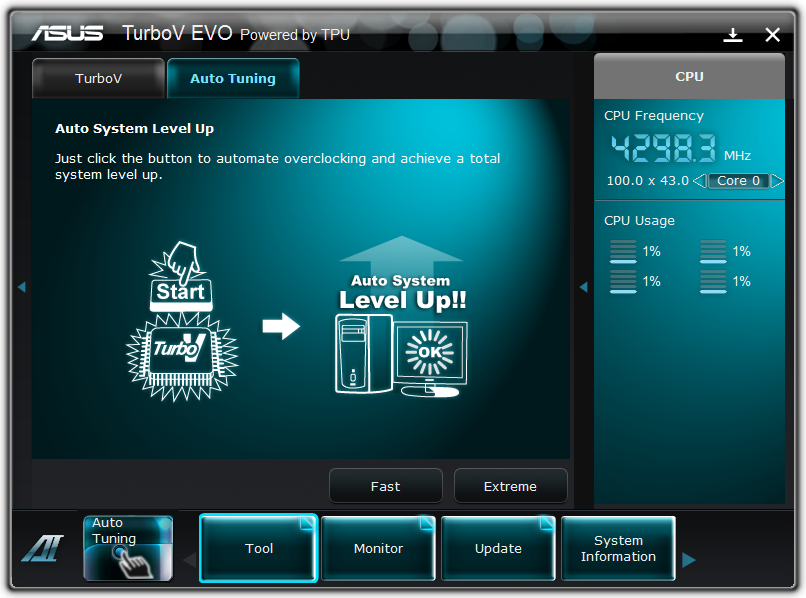
The Auto Tuning feature that you can see on the left is something which will automatically overclock your PC for you. There are two different pre-sets which are ‘Fast’ and ‘Extreme’. I have been over these in detail with my experiences in the overclocking section of this review.
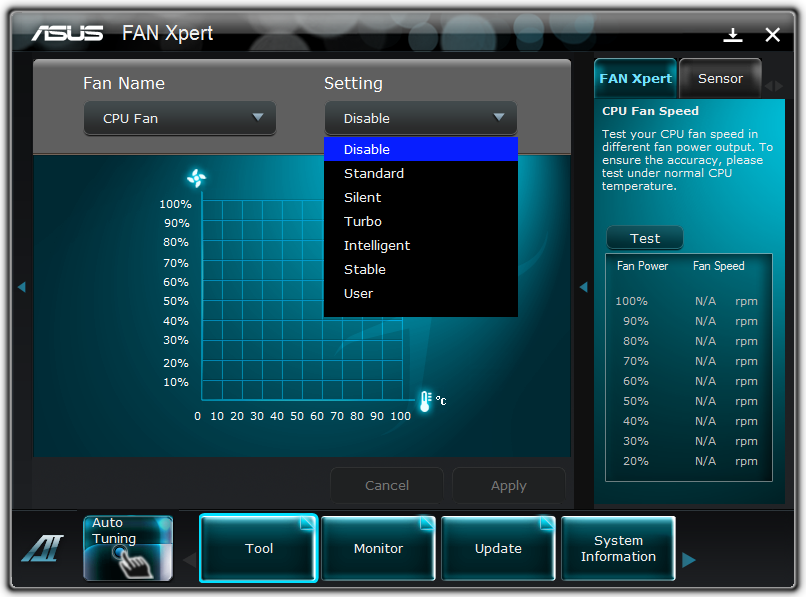
ASUS FAN Xpert allows you to create custom fan profiles. You can choose from various preset settings as well as a ‘user’ option which allows you to change the fans to your requirements. When you choose the user option, you can choose where and when the fans start to ramp up. In all fairness, there are enough options within the FAN Xpert to satisfy most people but every one of us may have a slightly different perception of what the ideal settings should be.
Finally, we have the Update and System Information tabs. They pretty much speak for themselves - you can update your EFI revision from within Windows using this feature. If you want to update your EFI using this method, do this at your own risk. The best way to ensure a flawless update is at default EFI settings. The ‘System Information’ tells you about your CPU, motherboard and RAM, sort of like an in-built CPU-Z.


Test Setup
| Processor |
Intel Core i5 2500K ES 4 cores, 4 threads, 6MB L3 |
| Motherboards | ASUS P8P67 |
| Cooling | Thermalright Ultra 120 eXtreme with one 120MM fan |
| Power Supply |
Silverstone 1000W Silver (Power Testing) OCZ ZX Series 1250w 80 PLUS Gold |
| Memory | Patriot Viper Extreme DDR3-2000MHz 9-11-9-27 2x4GB - 1.65v |
| Memory Settings | DDR3-1333MHz - 9-9-9-24 1T at 1.65v |
| Video Cards | Sapphire HD 5850 1GB |
| Video Drivers | Catalyst 10.12 |
| Hard Drive | Crucial C300 |
| Optical Drive | Samsung SH-S223Q |
| Case | Dimastech Bench Table |
| Operating System | Windows 7 64-bit |
| SATA Testing | Crucial C300 |
| USB 2/3 Testing | Patriot 64GB SuperSonic USB 3.0 |
Note - we will be moving to more recent drivers soon. We still use the 10.12 at the minute to keep parity between motherboard reviews, but this will be updated in the near future.
Comparison to Previous Results:
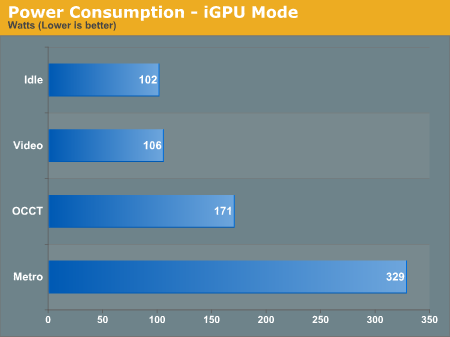
Power consumption was tested on the system as a whole with a wall meter connected to the power supply, while in a dual GPU configuration. This method allows us to compare the power management of the UEFI and the board to supply components with power under load, and includes typical PSU losses due to efficiency. These are the real world values that consumers may expect from a typical system (minus the monitor) using this motherboard.
CPU Temperatures
With most users running boards on purely default BIOS settings, we are running at default settings for the CPU temperature tests. This is, in our outward view, an indication of how well (or how adventurous) the vendor has their BIOS configured on automatic settings. With a certain number of vendors not making CPU voltage, turbo voltage or LLC options configurable to the end user, which would directly effect power consumption and CPU temperatures at various usage levels, we find the test appropriate for the majority of cases. This does confict somewhat with some vendors' methology of providing a list of 'suggested' settings for reviewers to use. But unless those settings being implemented automatically for the end user, all these settings do for us it attempt to skew the results, and thus provide an unbalanced 'out of the box' result list to the readers who will rely on those default settings to make a judgement.
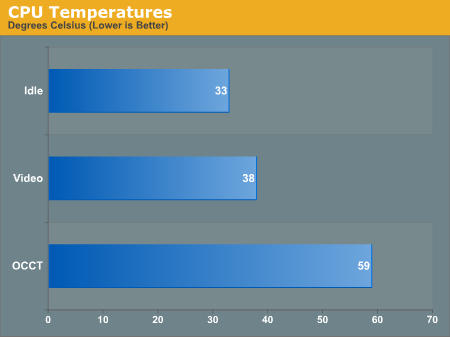
The temperatures which I recorded are higher than motherboards from other manufacturers in a similar price bracket.
LAN Speed Test
LAN Speed Test is a freeware program designed for testing the network connection between two PCs on a home network. The speed of the transfer is limited by the lowest common denominator on the network, so if you have gigabit Ethernet capable computers but a 100 Mbit capable router, you are limit to 100 Mbit transfer. Note that this is really a formality – if a network port is rated at 1 Gbps, then chances are that it will hit at least 90+% of this value. The main test here is CPU usage, and how much is offloaded by the controller. For this test, we use LAN Speed Test to transfer a 1000 MB file across a home network with a 100 Mbps lowest common speed to the same machine each time, in a read/write scenario. CPU usage is taken as a visual max/average from task manager. Note: future LAN speed tests will be at the Gbps level.
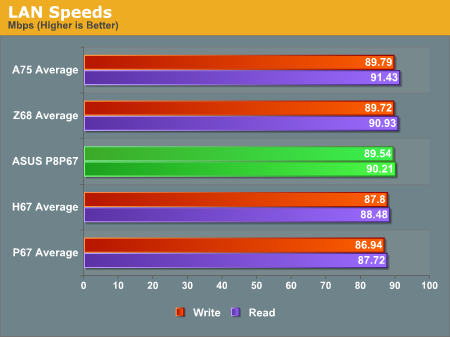
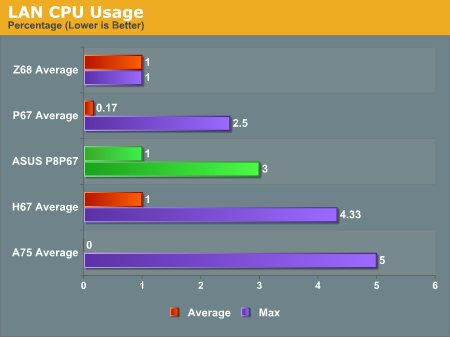
The results on this board are above average so that is a good sign. The CPU usage is low and that means the Realtek controller doing its job so that the transfer does not eat up too much of the systems resources.
DPC Latency
Deferred Procedure Call latency is a way in which Windows handles interrupt servicing. In order to wait for a processor to acknowledge the request, the system will queue all interrupt requests by priority. Critical interrupts will be handled as soon as possible, whereas lesser priority requests, such as audio, will be further down the line. So if the audio device requires data, it will have to wait until the request is processed before the buffer is filled. If the device drivers of higher priority components in a system are poorly implemented, this can cause delays in request scheduling and process time, resulting in an empty audio buffer – this leads to characteristic audible pauses, pops and clicks. Having a bigger buffer and correctly implemented system drivers obviously helps in this regard. The DPC latency checker measures how much time is processing DPCs from driver invocation – the lower the value will result in better audio transfer at smaller buffer sizes. Results are measured in microseconds and taken as the peak latency while cycling through a series of short HD videos - under 500 microseconds usually gets the green light, but the lower the better.
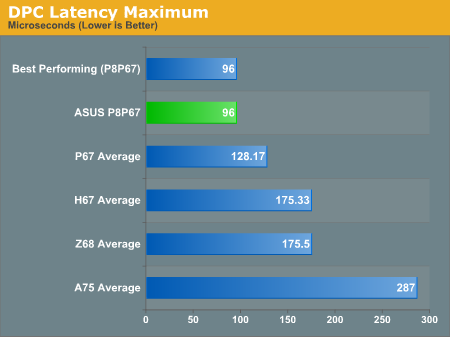
96us is the lowest latency we have had on the Sandy Bridge platform.
USB Speed
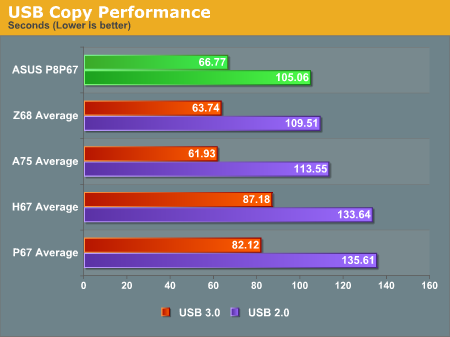
For this benchmark, we run CrystalDiskMark to determine the ideal sequential read and write speeds for the USB port using our 64GB Patriot SuperSpeed USB 3.0 drive. Then we transfer a set size of files from the SSD to the USB drive, and monitor the time taken to transfer. The files transferred are a 1.52 GB set of 2867 files across 320 folders – 95% of these files are small typical website files, and the rest (90% of the size) are the videos used in the Sorenson Squeeze test.
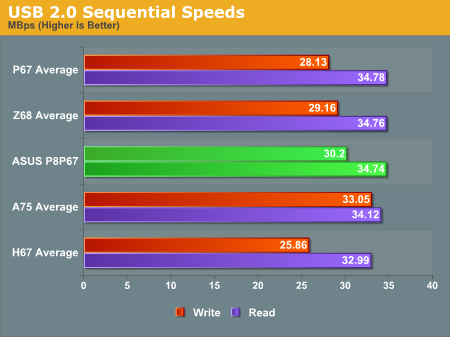

Overall, the P8P67 is only a fraction behind its bigger brother, the P8P67 Pro.
SATA Testing
We also use CrystalDiskMark for SATA port testing. The operating system is installed on the Micron RealSSD C300, which is rated at 355 MBps read and 215 MBps write, and the sequential test is run at the 5 x 1000 MB level. This test probes the efficiency of the data delivery system between the chipset and the drive, or in the case of additional SATA ports provided by a third party controller, the efficiency between the controller, the chipset and the drive.
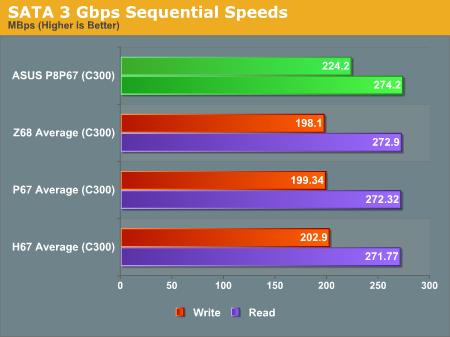
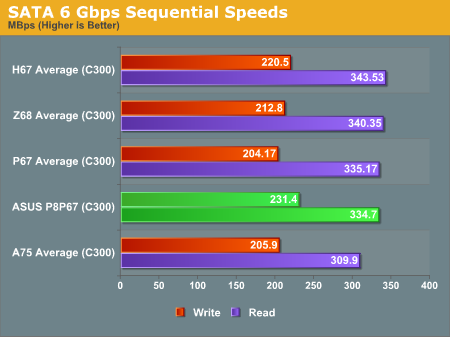
The P8P67 has given us the fastest set of SATA 3 Gbps write speeds we have seen thus far. Strangely enough, it is 25.2 MBps faster than the P8P67 Pro which costs more – however, the P8P67 Pro beats it in read speeds but only by 8 MBps.
Moving on to the SATA 6 Gbps results, the write speeds are good. Second from top is nothing to be sniffed at when you consider the price of the motherboard. The read speeds do not impress as much but they are not the slowest we have seen. It does beat the ASRock Extreme4 and the Gigabyte P67A-UD4 which are both in a similar price bracket but the Gigabyte board does have the upper hand when it comes to read speeds.
3D Movement Algorithm Test
This first benchmark uses various algorithms for three-dimensional simulation and movement of independent particles. The algorithms both employ uniform random number generation or normal distribution random number generation, and vary in various amounts of trigonometric operations, conditional statements, generation and rejection, fused operations, etc. The benchmark runs through six algorithms for a specified number of particles and steps, and calculates the speed of each algorithm, then sums them all for a final score. This is an example of a real world situation that a computational scientist may find themselves in, rather than a pure synthetic benchmark. The benchmark is also parallel between particles simulated, and we test the single thread performance as well as the multi-threaded performance.
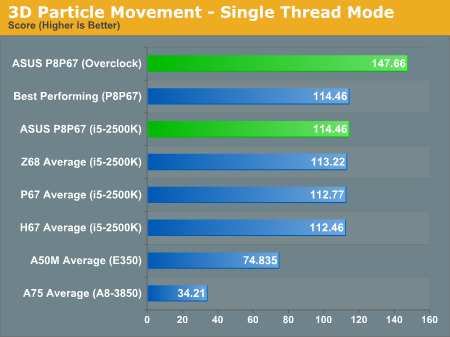
The ASUS P8P67 has taken the performance crown in the single-threaded version of our 3D Movement test.
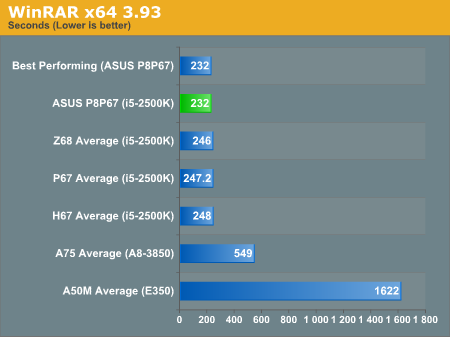
WinRAR x64 3.93
With 64-bit WinRAR, we compress the set of files used in the USB speed tests. WinRAR x64 3.93 attempts to use multithreading when possible.
FastStone Image Viewer 4.2
FastStone Image Viewer is a free piece of software I have been using for quite a few years now. It allows quick viewing of flat images, as well as resizing, changing color depth, adding simple text or simple filters. It also has a bulk image conversion tool, which we use here. The software currently operates only in single-thread mode, which should change in later versions of the software. For this test, we convert a series of 170 files, of various resolutions, dimensions and types (of a total size of 163MB), all to the .gif format of 640x480 dimensions.
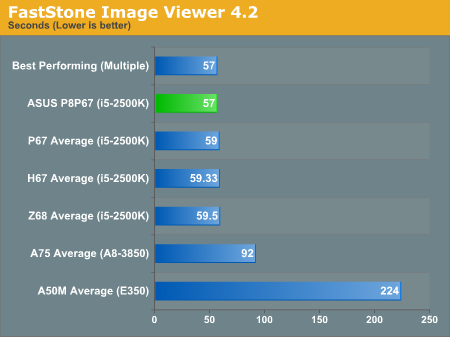
57 seconds is a joint top position which is currently shared by three contenders – the P8P67, the P8P67 Pro and the ASRock Extreme4.
Sorenson Squeeze 6.0
Sorenson Squeeze is a professional video encoder, complete with a vast array of options. For this test, we convert 32 HD videos, each a minute long and approximately 42 MB in size, to WMV 512KBps format. Squeeze can encode multiple videos at once, one for each thread.
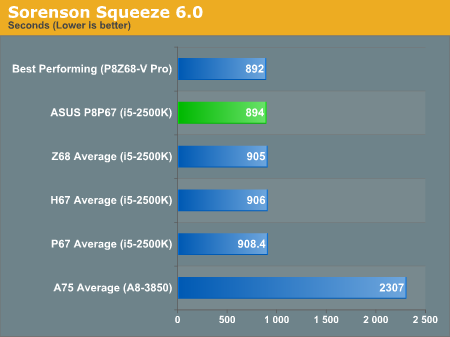
894 seconds is a good result and nests itself high up in the table.
Dirt 2
Dirt 2 came to the PC in December 2009, developed by Codemasters with the EGO Engine. Resulting in favorable reviews, we use Dirt 2’s inbuilt benchmark under DirectX 11 to test the hardware. We test two different resolutions at two different quality settings using a discrete GPU, and an appropriate integrated GPU setting.
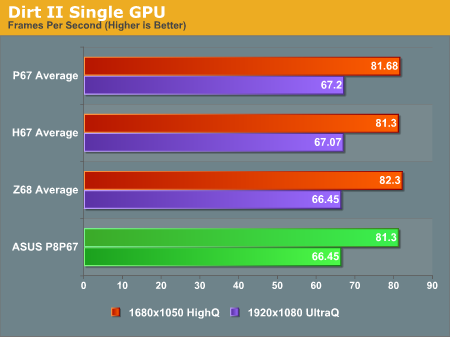
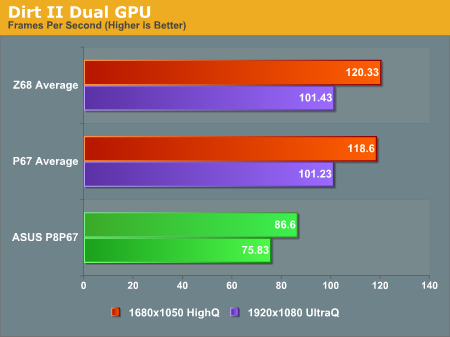
At 1680x1050, the results are all fairly similar from what we have tested in the past. At 1920x1080, the results portray a different story. When you use a single GPU, the results are all fairly similar but when you use a dual GPU configuration, the x4 secondary PCIe lane becomes apparent. Whilst all of the other motherboards manage between 100 and 105 frames per second, the P8P67 only manages to get just under 76. Due to the testing methodology being exactly the same, the only explanation is that there is not enough bandwidth.
Metro 2033
Metro 2033 is a challenging DX11 benchmark that challenges every system that tries to run it at any high-end settings. Developed by 4A Games and released in March 2010, we use the inbuilt DirectX 11 Frontline benchmark to test the hardware.

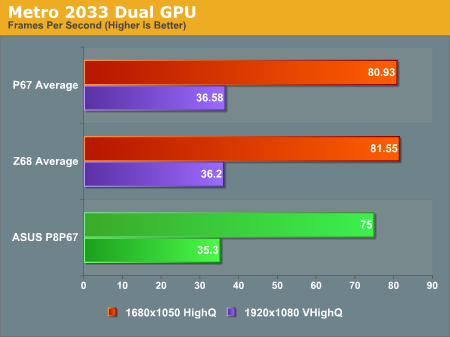
The single GPU results are remarkably similar to all of the other results which we have on record. There is one thing that did differ to the DiRT2 testing though - In Metro 2033, the dual GPU scaling is almost as good as with any other motherboard in 1920x1080.
Conclusions
Overall, when you look at the results as a whole, they are neither good nor bad for a single GPU. However, with the second PCIe lane being limited to 4x, the results are quite a bit slower in some of our tests when compared to a board which utilizes x8/x8 rather than x16/x4. This may be enough to deter people away from this motherboard but in order to bring a board to the market with a budget price in mind; you have to cut down on a few features here and there.
Final Words
This is the first motherboard I personally have used on that has a UEFI BIOS and I have to say it is a nice change from the traditional BIOS. Some may argue that the UEFI BIOS is still in its infancy and if this is the case, I think we are looking at something great in the future. From what I can see, the ASUS BIOS engineers have done a good job in producing something that is straightforward and easy to use. The CPU temperature reported in the shipping UEFI BIOS was the only issue I could find. However, as mentioned in the review, I updated the BIOS after all of my testing was done and the CPU temperature appeared to be more accurate.
Even though the P8P67 does not offer as many features as the more expensive models in this range, or even some of the optional extras in the box which other boards come with in the same price range, it does perform better than you may have initially thought. The dual GPU side of things is what lets this motherboard down. Due to the x16/x4 arrangement, rather than the x8/x8 we see on most other P67 boards, it really restricts the amount of data which the second GPU can receive. Therefore the user will not benefit from as much of an increase in frames, but there is scope for other utilities. The power consumption is also higher than other motherboards we have tested.
Overall, despite this board being available for a little while I would say this motherboard is a good contender in the P67 sub $160 price range, but some of the additional extras which come with the ASRock P67 Extreme4 for example may be enough to sway people towards that board instead.


